
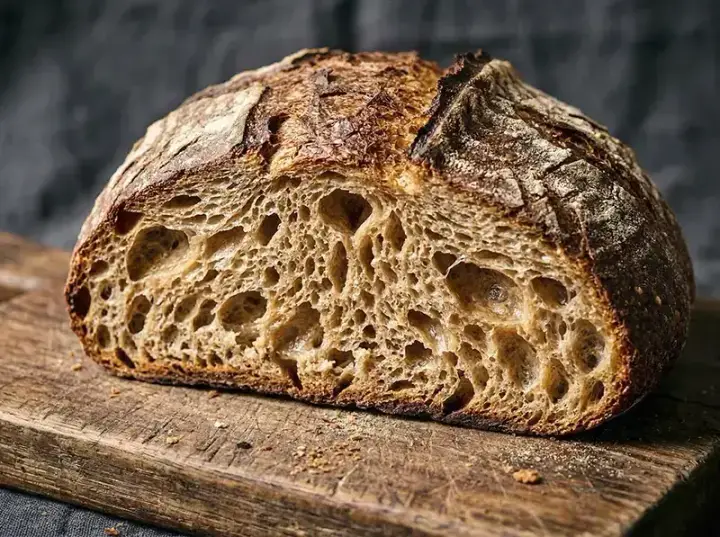
No-Knead Bread
Four ingredients, five minutes of actual work, twelve to eighteen hours of waiting, and a screaming-hot Dutch oven. Jim Lahey published this method in the New York Times in 2006 and it changed home baking permanently. A very wet dough and a long slow fermentation do everything that kneading normally does — they develop the gluten structure and build the flavor. The result is a crackly crust, an open airy crumb, and depth of flavor that shorter methods can't produce.
Ingredients
- 430 gbread flour or all-purpose flour
- 1 ginstant yeast
- 9 gfine salt
- 345 mlwater
Method
- Evening, day before: In a large bowl combine flour, salt, and yeast. Add the water. Stir with a wooden spoon or your hand until no dry flour remains — about 30 seconds. The dough will be shaggy, sticky, and wet. That's exactly right. Do not add more flour. Cover the bowl tightly with plastic wrap or a lid.
- Let the dough ferment at room temperature for 12–18 hours. You'll know it's ready when the surface is covered in bubbles and the dough has more than doubled. It should smell pleasantly tangy and yeasty. If your kitchen is cold it may need the full 18 hours; if warm, 12 may be enough.
- When the dough is ready, generously flour a clean work surface. Scrape the dough out — it will be sticky and stretch in long threads. Don't fight this. Gently fold the dough over itself a few times using a scraper or your hands. Shape it loosely into a ball. Place it seam-side down on a large piece of lightly floured parchment paper. Dust the top with flour, drape a clean kitchen towel over it, and let rest 1.5–2 hours. It should puff noticeably.
- About 30 minutes before the dough is ready, place a Dutch oven or heavy pot with a lid into the oven and preheat to 245°C (475°F). The pot must be screaming hot when the bread goes in — this is the oven within an oven that creates the crust.
- When the dough has proofed, carefully take the Dutch oven out. Lower the dough in using the parchment paper as a sling. Score the top with a sharp knife or scissors if desired. Cover and bake for 30 minutes. Then remove the lid and bake another 12–15 minutes until the crust is deeply golden-brown.
- Remove the bread and let it cool on a wire rack for at least 45 minutes before cutting. Cutting it hot seems tempting, but the crumb is still setting inside — slice too early and it compresses and becomes gummy.
FAQ
The Dutch oven serves two functions: it traps steam released by the dough in the first 30 minutes of baking (creating the crackling crust) and transfers intense heat evenly from all sides. Without a Dutch oven, use any oven-safe pot with a lid that can handle 245°C — a cast iron casserole, a ceramic cocotte, or even a large stainless pot. The lid is the critical part. If you have no lidded pot, place a deep baking tray inverted over a heavy baking sheet with the bread on it to trap some steam.
Four common causes: the dough was underproofed (the surface should be covered in bubbles, not just a few); the oven or pot wasn't hot enough (preheat both for at least 30 minutes at full temperature); too much flour was added during shaping (the dough needs to stay wet); or the dough was overhandled during shaping and the gas pockets were knocked out. Handle it gently — fold, don't press.
Yes, up to about 24 hours at room temperature is generally safe. Beyond that the yeast runs out of food, the gluten begins to break down, and the dough becomes too slack to hold its shape. If you want to extend past 24 hours, put the dough in the refrigerator after the initial 12 hours. Cold fermentation can continue for up to 3 days and develops even more flavor. Take it out 1–2 hours before shaping to let it warm up.
Yes. Substituting up to 30% with whole wheat (about 130 g whole wheat to 300 g white) gives a nuttier flavor and slightly denser crumb without major changes to technique. Beyond 30% add an extra 30–50 ml of water because whole wheat absorbs more. The fermentation time may need to extend slightly as whole wheat slows the yeast.
Two visual cues: the dough should have at least doubled in volume, and the surface should be dotted with bubbles. If you poke the shaped dough lightly with a floured finger, it should spring back slowly, not immediately (underproofed) and not stay as a dent (overproofed). The dough also becomes much softer and more jiggly when correctly proofed. Smell is reliable too — correctly fermented dough has a pleasant tangy-yeasty aroma.
Keep browsing
More dishes from the American archive — picked by overlap with what you're cooking now.
Recipes by email
One letter a week: a recipe picked for your taste, plus whatever is new on the site. Unsubscribe in one click.
Welcome gift: Sergei's cookbook (e-book).
By subscribing you agree to the privacy policy.
Tell us what you like to cook (30 seconds) →
Join the conversation
Comments
No comments yet — be the first!