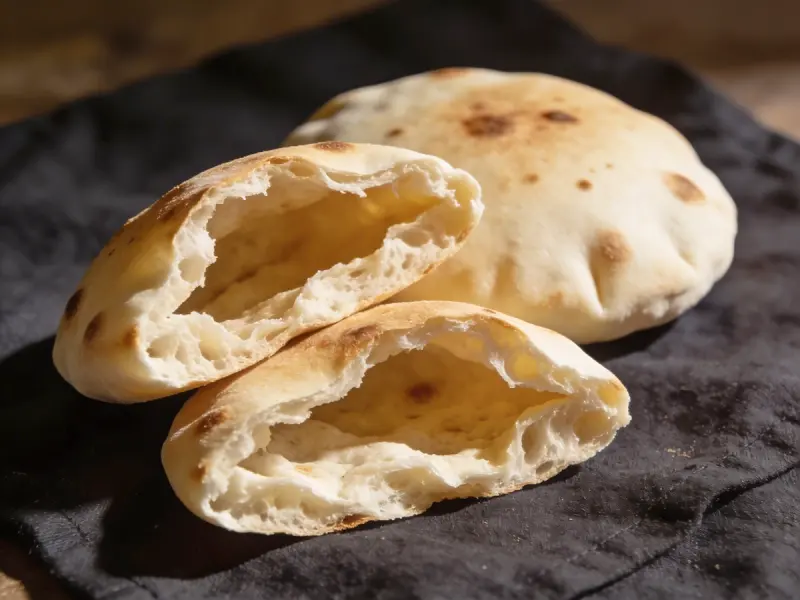
Pita Bread
Pita (from the Greek πίτα) is the ancient leavened flatbread of the Middle East and Eastern Mediterranean — one of the oldest breads in recorded history, dating to at least 2500 BCE in the ancient Near East. Its defining characteristic is the hollow pocket that forms during baking: when a thin disc of well-hydrated yeast dough hits an extremely hot baking surface, the water in the dough converts instantly to steam, inflating the two layers of dough apart like a balloon. As the bread cools, the steam escapes and the pocket collapses — but the internal separation remains, creating the pocket that makes pita the ideal vehicle for falafel, shawarma, hummus, and mezze. The technique is simple but precise: the right dough hydration, the correct thickness (4 to 5 mm), and a screaming-hot baking surface are the three variables that determine whether a pita puffs completely or bakes flat.
Ingredients
- 400 gbread flour or plain flour
- 7 ginstant yeast
- 1 tspsugar
- 1 tspfine salt
- 2 tbspolive oil
- 260 mlwarm water
Method
- Make the dough. Combine flour, instant yeast, sugar, and salt in a large bowl. Add the olive oil and warm water. Mix until a shaggy dough forms, then turn out and knead by hand for 8 to 10 minutes until the dough is smooth, elastic, and slightly tacky. It should pass the windowpane test: a small piece stretched with both hands should become translucent without tearing. The hydration of pita dough is higher than bread dough — this moisture is what creates the steam for pocket formation. Do not add extra flour to make the dough easier to handle.
- Rise. Shape the dough into a ball and place in a lightly oiled bowl. Cover with cling film or a damp cloth and leave at room temperature until doubled in size, 60 to 90 minutes depending on kitchen temperature. The rise develops flavor and gluten strength. Alternatively, rise in the refrigerator overnight (8 to 16 hours) for more complex flavor — bring to room temperature for 30 minutes before shaping.
- Preheat the oven. Place a pizza stone, heavy cast-iron pan, or an inverted heavy baking sheet on the highest rack of the oven. Preheat to the highest temperature your oven can reach — 250 to 260°C (480 to 500°F) — for at least 30 minutes. This extended preheating is essential: the baking surface must be scorching hot for the steam to form instantly when the dough makes contact. A surface that is merely warm will produce flat, dense pita with no pocket.
- Shape the pitas. Punch down the risen dough. Divide into 8 equal portions (about 85 g each). Roll each portion into a smooth ball. Working with one at a time (keep the rest covered), roll on a lightly floured surface to a circle 18 to 20 cm (7 to 8 inches) across, 4 to 5 mm thick. Uniform thickness is critical — thicker areas will not inflate, thinner areas may tear. Do not roll thinner than 4 mm. Do not poke or press with your fingers — any hole in the surface will prevent puffing.
- Bake. Working quickly, slide one pita directly onto the screaming-hot baking surface. Bake for 3 to 5 minutes. Within 2 to 3 minutes the pita should balloon dramatically to a full sphere. Do not open the oven door during the first 2 minutes. Once puffed and very lightly coloured (not golden — pale), remove immediately with tongs or a spatula. Stack the baked pitas under a clean cloth — the trapped steam keeps them soft and pliable as they deflate and cool. Serve warm. Any pita that did not puff is still edible as a flatbread.
FAQ
Flat pita is almost always caused by one of four problems. First and most common: the oven and baking surface were not hot enough. The baking surface must be preheated for at least 30 minutes at the highest temperature your oven can reach — 250 to 260°C. A surface that is merely warm produces flat bread. Second: the pita was rolled too thick or too thin. The sweet spot is 4 to 5 mm — thicker areas cannot generate enough steam pressure to separate the layers; thinner than 3 mm and the dough tears before inflating. Third: there are holes or tears in the dough from rolling, which allow the steam to escape. Fourth: the dough is under-hydrated. This recipe at 65% hydration is designed for puffing — do not add extra flour.
Rate this
Keep browsing
More dishes from the Lebanese archive — picked by overlap with what you're cooking now.
Join the conversation
Comments (1)
The pocket forms because of steam. The dough hits a screaming hot oven, the outside crusts over instantly, and the trapped moisture inside creates a balloon effect that splits the dough into two layers. If your oven is not hot enough or your dough is too thick, you get flatbread instead of pita. I bake on a preheated baking stone at 260°C and the pitas inflate within 90 seconds. Pull them out as soon as they puff — overbaking makes them dry and stiff. Stack them in a clean kitchen towel to keep them soft.