美国 · 面粉和糕点产品 · 素食
无揉面包
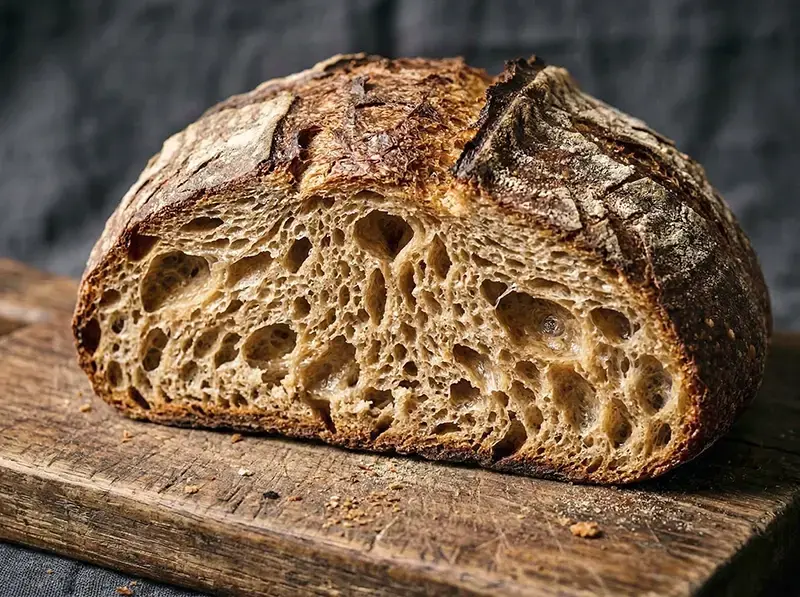
四种食材,五分钟实际操作,十二至十八小时等待,一口烧得通红的铸铁锅。吉姆·拉赫于2006年在《纽约时报》发表了这种方法,从此永久改变了家庭面包烘焙。极湿润的面团和漫长缓慢的发酵,完成了通常需要揉面才能做到的一切。成品:开裂的酥脆外壳,开放式的蓬松内芯,以及任何快捷方法都无法复现的深度风味。
780 分钟 180 大卡 10 人份 进阶🌿素食🇺🇸美国★★★★★4.6· 5 条评论
食材
份量公制
- 430 克高筋面粉或普通面粉,另备少量撒粉用
- 1 克速溶酵母
- 9 克细盐
- 345 毫升室温水
做法
- 前一天晚上:在大碗中混合面粉、盐和酵母。加入水,用木铲或手搅拌约30秒直到看不到干面粉。面团会是凌乱的、黏手的、湿润的——这完全正确。不要加更多面粉。用保鲜膜或盖子将碗密封好。
- 在室温下发酵12至18小时。判断好了的标志:表面布满气泡,体积膨胀超过一倍,闻起来有令人愉快的轻微酸味和酵母香。厨房较冷需要满18小时;较温暖12小时可能就够了。
- 面团准备好后,在操作台上大量撒粉。将面团倒出——它会黏着并拉出长长的细丝,顺着它不要硬来。用刮板或双手轻轻折叠几次,松散地整成球形。缝口向下放在撒了面粉的烘焙纸上。顶部撒粉,盖上干净厨巾,静置1.5至2小时直到明显膨起。
- 在面团准备好前约30分钟,将带盖铸铁锅放入烤箱,预热至245°C。锅必须是滚烫的——这是「烤箱中的烤箱」,是酥脆外壳形成的关键。
- 面团发好后,小心取出铸铁锅。用烘焙纸当吊带将面团放入锅中。如果想要,用利刀在顶部划口。盖上盖子烤30分钟。然后去掉盖子再烤12至15分钟,直到外壳呈深金棕色。
- 取出面包放在冷却架上至少45分钟后再切。趁热切看起来很诱人,但内芯还在定型——切太早会压塌内芯让面包变黏糊。
常见问题
铸铁锅有两个作用:前30分钟锁住蒸汽(形成酥脆外壳),以及从各个方向均匀传递强热。没有铸铁锅,可以用任何能承受245°C的带盖烤箱容器。盖子是关键。如果真的没有带盖的锅,可以把一个深烤盘反扣当作穹顶盖在面团上。
为它打分
Rate this recipe


Join the conversation
Comments (1)
Ingredient temperature matters enormously for no-knead bread. Unless the recipe says otherwise, everything should be at room temperature. Cold bread flour doesn't cream properly, and the texture suffers throughout.